
IS IT A drowning fern, or is it thirsty? It’s one of gardening’s great mysteries, a riddle: You keep watering because the surface inch of the soil appears dry, yet down deeper the roots is smothered in mud. Cacti are the reverse: You know exactly when to water (the right minute!) but then you miss your chance, and voila: They are all shriveled and sorry-looking.
That kind of guessing is actualy wasteful: water is wasted, plants are killed, and gardeners, whether it is the weekend or not, is furious. With the help of soil moisture meter, however, all the guesswork goes out the window. There’s no need to wonder whether the plant just likes being dry or if it’s really thirsty.
How to Use a Soil Moisture Meter
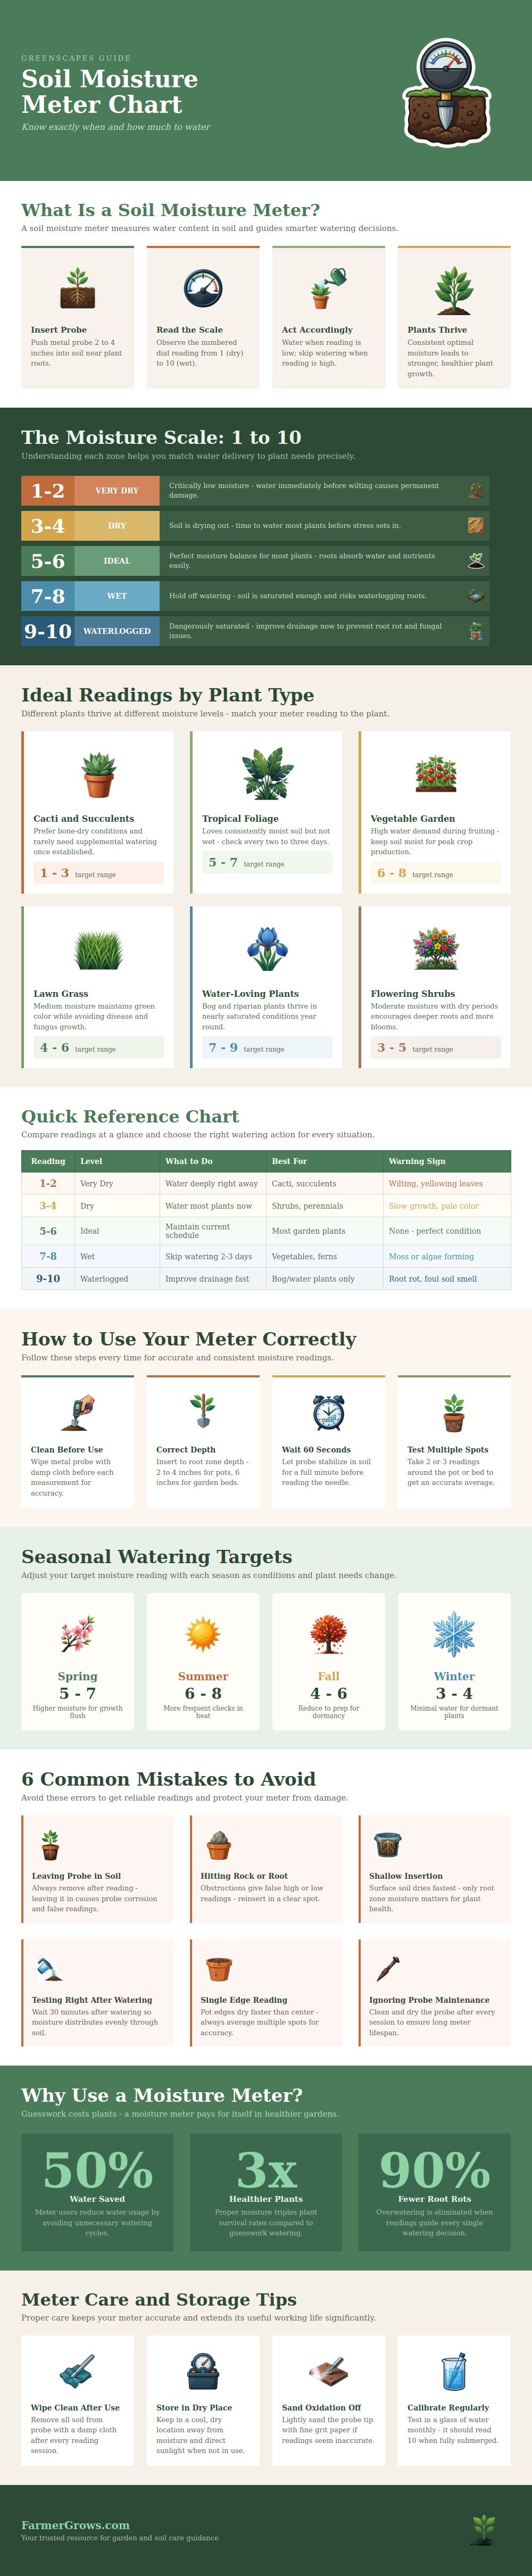
With this tool, you get a concrete number, a real answer as to what’s going on under there. And here’s how that works (infographic above): The one-to-10 range turns those abstract emotions into actionable steps. One or two equals critically dry, so act fast or risk permanent damage. Nine or 10? Waterlogged: time for the roots to start rotting away. In the middle of the range (five to six) is the sweet spot for most garden plant, the perfect balance of moisture for them to absorbs nutrients.
And knowing these zones makes everything different than when you’re thinking about the garden. Some plants are very tough (a five to seven rating for a tropical foliage plant, which likes the soil always slightly moist but never soaked). Others want more moister conditions (such as a vegetable garden in the fruiting phase, often a six to eight), and so forth. You’ll go away disappointed if you manage a tomato plant as though it were a succulent.
With this kind of knowledge; this chart, you can start to deliver what each plant really want. You can match the water delivery to the need instead of just wetting the dirt. It is food for thought and food for the root system.
Remember: How you use the tool is as important as understanding how to read it. First, don’t test immediately after watering (that’s when it reads falsely high, before the water has had time to move around). Give it at least half an hour for the water to settle then go check. Second, always wash off the probe with water between uses; otherwise buildup of soil can throw off the electrical resistance that the meter depends on based off its readings.
Third, don’t insert the probe too far up; surface soil dries out far more quickly than the root zone. If all you’re feeling is the top inch or so and you go ahead and water, you’ll be overwatering constantly. For a true sense of what the roots are facing, push the probe down 2-4 inches in pots, or deeper in garden beds.
Target numbers change with the seasons, too. During a growth flush in springtime, bump up the moisture routine and shoot for the five to seven end of things. In high-summer heat, you may be checking more but the target number is about the same. Come fall, back off the moisture again to ready them for dormancy; in winter months, most perennials and houseplants is content with very little water, often on the low end of the scale.
Not following this cycle will result in one of two extremes: shock or stagnation. Taking a few minutes to get your readings will save hours of replanting later. Better yet, you may find yourself cutting back on your water use while also maintaining a healthier-looking garden.
At first it’s weird: relying on a plastic stick for guidance rather than trusting your own intuition. Before long, though, the numbers comes naturaly. Your plants no longer look like they are struggling; they behave exactly the way they should of.
Until you learn to hear what the soil has been trying to tell you all along, it’s nothing more than dirt. That little meter speaks for them, and with it, you get a voice.