
You’ve got yourself a good-looking garden that quickly becomes a bad-looking one. The soil is cracked and the leaves is curled. Your lettuce is happy; your prized tomatoes aren’t. Why? It is not typically because they don’t get water, but more often (and worse) because they don’t get any where their roots want or need it.
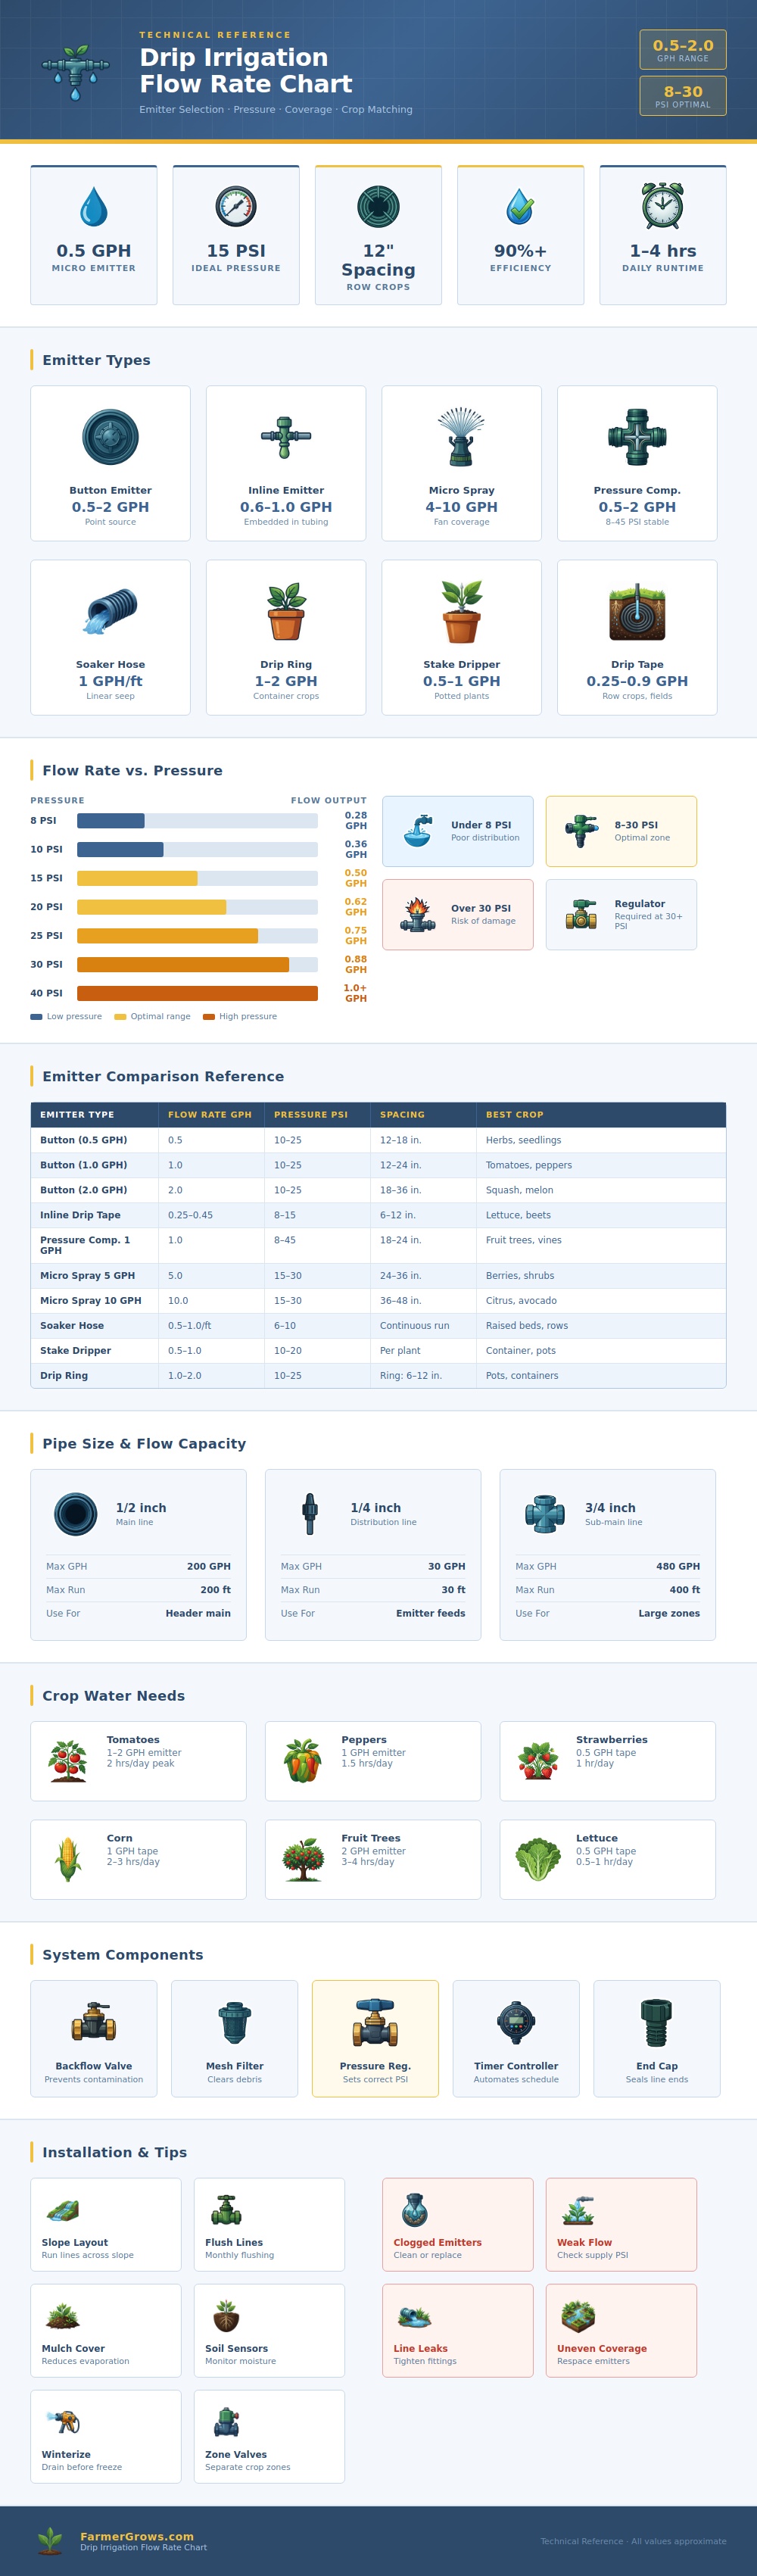
Drip irrigation. Sending water directly to the ground instead of up in the air, is supposed to fix all that. But this only works if you select the correct flow rate for what you’re watering. That intelligence begins here: knowing exactly how much water an emitter will really deliver when under pressure. These relationships is nicely explained in the infographic above.
How to Choose the Right Drip Irrigation Setup
We see that one micro spray unit can shoot out as much as ten times the amount of water per hour that a standard button emitter might emit (half a gallon per hour). There is such a huge difference in volume! Putting a gentler trickle on a thirsty squash plant will run the system for days before catching up with evaporation, but washing the topsoil off the surface of a delicate herb bed are all too easy an outcome if you have a heavy-flowing sprinkler on there.
In both cases, the wrong choice doesn’t just create waste, it means either drowning the roots and washing away topsoil or failing to keep up with evaporation. Matching the emitter to the crop is not only nice; it’s necessary for survival.
Pressure is a silent killer. Most people’s home drip system is killed by pressure. A standard home spigot pushes out water at a force that would blow up tender tubing, if not for a pressure regulator. And even with one, anything over 30-ish PSI (and down to as low as eight) are ideal, according to the visual guide.
Less than that, water dribbles so weakly that it’ll leave dry spots on the far side of your longest rows. More than that, emitters will quickly degrade or fall off their fittings. That’s why there’s always a pressure regulator directly behind the backflow preventer in any good set-up. You’re rolling the dice on each drop without it. Though it may seem like more pressure = better coverage, extra-strong force simply results in uneven distribution and early emitter failure in drip irrigation.
Emitter size is only one consideration; equally important is choosing the proper diameter of tubing. Consider this: You want a fast-flowing stream of water when filling a drinking glass in your kitchen sink. No matter how hard you suck, that’s not going to happen with a tiny straw. For small beds, half-inch polyethylene tubing are plenty; it moves water adequately without being overly sluggish.
But when you’ve got big vegetable rows to feed or several zones to water with large fruit trees, you’ll want the greater flow rate provided by three-quarter inch lines. This ensures friction loss doesn’t choke off the hose supply. The chart lists capacities for each size, which is a tough limit on the number of emitters you can group together without dropping the water pressure to critically low levels at the line’s end.
Speaking of space: A common mistake among beginning gardeners is putting down tubing at one-foot intervals no matter what you grow. It’s a waste and it isn’t needed. Things with wide-spreading roots, such as tomatoes and peppers, require more concentrated volume, and a one-gallon-per-hour emitter every eighteen to twenty-four inches are ideal.
Lettuce and other leafy greens appreciates uniform moistness all up and down the row. Their roots are very close to the surface and don’t like wet pockets where rot may set in. However, they do like steady light moisture from head to tail. Drip tape on low flow, placed closer together, will keep this kind of area evenly damp, without puddling water that runs off.
If you see random dry areas, it’s easy to assume it’s a maintenance issue, but then you’ll find some emitters have clogged up. Whether it’s with debris getting through your filter, or simply mineral build-up, take off those end caps and flush the line once per month for ten minutes. A few minutes now will save you hours down the road trying to figure things out. Better yet, give the system a quick go without end caps on rather than having half of your investment gummed up with calcium from hard well water.
Prepare for winter before the first hard frost. Years of hardware will be protected from expanding ice within narrow plastic walls. Drain all your gear down, blow out any residual air pockets you can. Store storable components in house. Boring stuff… but not doing so results in purchasing new tubing next spring.
In all, then: Drip irrigation makes watering a chore become a precise science. By paying careful attention to pressure and matching the right flow rate to each plant’s needs, the garden no longer fights back against you. Instead, water goes exactly where it belongs, supporting the roots with zero drama or waste. One calibrated drop at a time, it’s just simple engineering that pays off if you pay attention and are patient. Dry dirt becomes lush again.