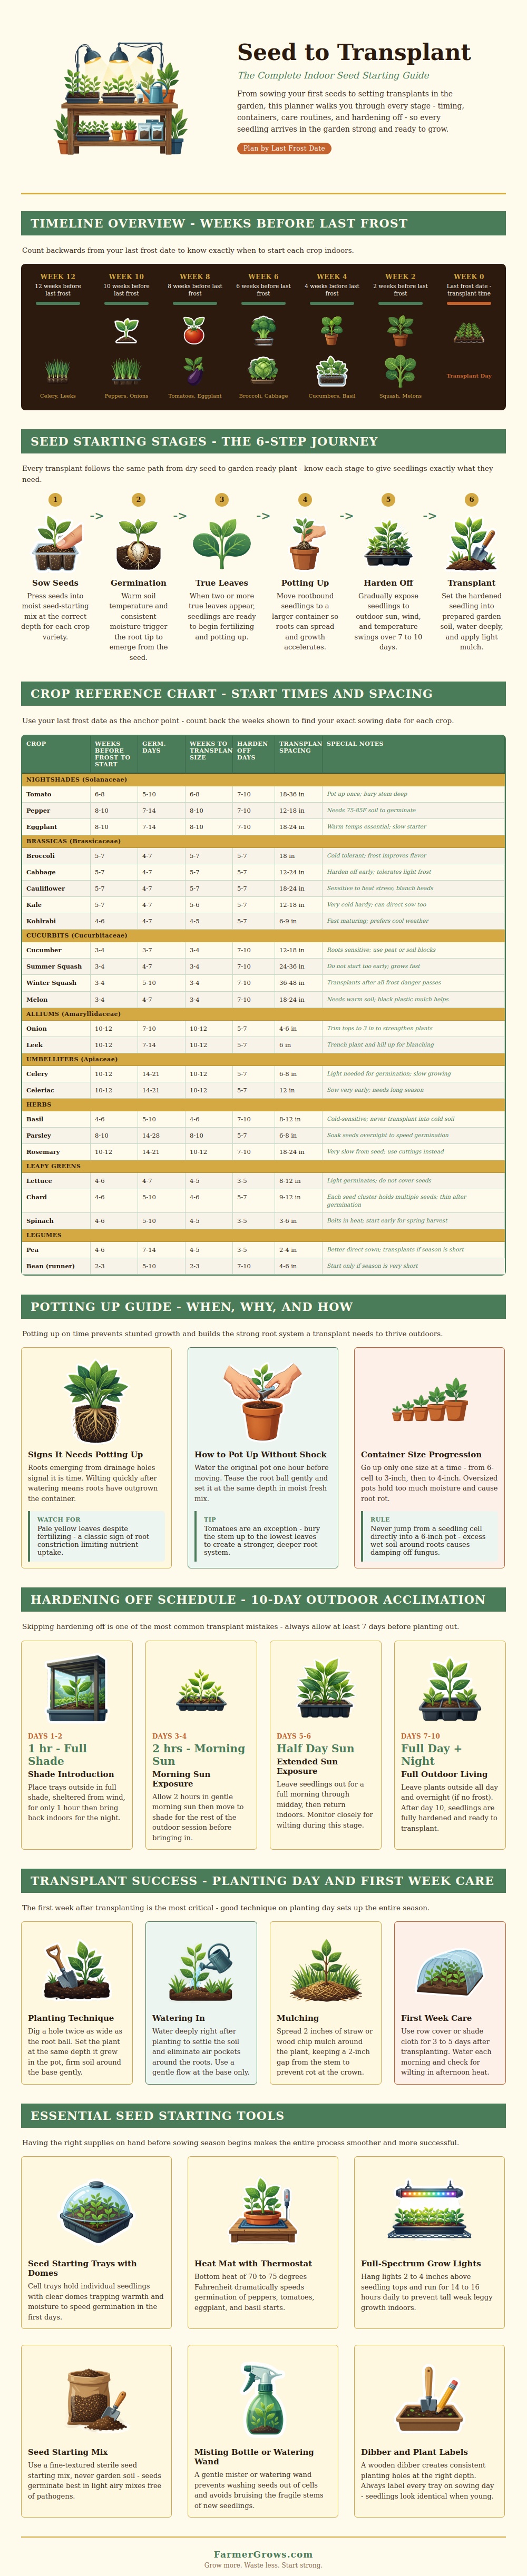
Starting seeds indoors allow you to start your growing season early. However, using the correct timing for starting seeds will ensure that your seeds grows successfuly. The seeding period for each crops will depend on the last frost date in your area.
If you start your seeds at the wrong time, you may end up with a weak plant. However, starting your seeds at the right time will give you a sturdy transplant. Hence, the last frost date is the most important piece of information to determine the timing of when to start your seeds indoors.
When to Start Seeds Indoors
The infographic demonstrates a timeline that you can use to determine when to start your seeds indoors by counting backward from the last frost date in your area. You can use this timeline to determine when to place each type of crop into a seed tray. For example, you will place peppers and onions into seed trays at the beginning of the timeline because these two crops tend to grow slow when they are first beginning to grow.
Cucumbers and squash will be later in the timeline because they will take longer to begin grow. This infographic makes it easier for individuals to determine the best time for each crop without guessing. Starting your seeds in the correct sequence is important for the growth of your plants.
For example, seeds will need warmth and moisture until they germinate. However, once the seeds have developed their first true leaf, they will need exposure to light to continue growing. Following these steps will allow the plants to continue into the next phase of their growth cycle.
Completing each of these six steps will ensure that the plants develops properly. For instance, the potting up step should occur when the root starts to circle the cell within the seed tray to avoid stalling the growth of the plant. Another example is that hardening off take place over a seven to ten day period to allow the plants to become used to the sun and the wind in there outdoor environment.
This will ensure that the plants will not struggle when they are transplanted outdoors. Furthermore, there is also a reference chart that demonstrates the information regarding each type of crop. This chart categorizes each type of crop into a plant family.
It also includes information regarding when to start each type of plant, how long it will take for the seeds to germinate, how many week it will take for each plant to reach transplant size, and the spacing requirements for each type of plant. This reference chart allows individuals to understand why crops like celery will require an early start to grow properly. However, you will start beans later.
For instance, plants within the same family have similar requirements for growing conditions. Tomatoes, peppers, and eggplants (nightshade family) will require warm soil to germinate the seeds. However, brassica plants like cabbage and kale can tolerate cooler temperatures within their environment, both indoors and in there transplanted outdoor home.
Another important component of this infographic is the ten-day hardening-off schedule for the transplanted plants. During the first two days of the hardening-off schedule, you will place the young plants in the shade for short periods. On days five and six of the hardening-off schedule, the plants will be left outside for half of the day.
Finally, during the last few days of the hardening-off schedule, the plants can be left outside overnight if the outdoor temperatures are high enough. Following this schedule will ensure that the plants are gradually adjusted to their outdoor environment. A sudden change in their environment will negatively impact there growth.
By using this ten-day schedule, individuals will be successful in avoiding this detrimental effect on their seedlings. The infographic includes information regarding the steps to take on the day that you will be transplanting the plants into the ground in your yard. When you begin to transplant your plants into the ground, you should dig the hole wide enough to allow for the root ball to be placed into the ground.
Furthermore, the plant should be placed into the ground at the same depth as the plant was when it was growing within its pot. After placing the plant into the ground, water the plant deeply to allow the soil to settle around the plants roots. Furthermore, apply mulch around the plant, but leave a small gap around the stem of the plant.
These steps will prevent air pockets from forming around the roots of the plant and will ensure that the crown of the plant does not rot. After placing the plants into the ground, you can also use row covers for the first few days after the plants are transplanted into their ground homes. These row covers will protect the young plants from insects and ground temperature fluctuations.
Furthermore, the first week after transplanting is important for the plants’ survival. The infographic also demonstrates the tools that will be needed to start your seeds indoors. For example, you will need seed starting trays, heat mats, full-spectrum lights, and a sterile starting mix.
You will need to hang the lights close to the seedlings when growing them indoors to prevent the seedlings from becoming leggy when they germinate. Furthermore, to prevent damping-off, you will need to use a sterile starting mix to start your seeds. Having these tools ready prior to starting the process of sowing the seeds will ensure that you do not experience any delay prior to the time indicated on your calendar when you should begin starting your seeds indoors.
Overall, the infographic demonstrates to the reader the process of starting seeds indoors from beginning to end. The process begins with the last frost date in your area and ends with your transplanted plants becoming accustomed to their outdoor environment. Following the information depicted in the infographic will allow you to begin your gardening season successful.
Following the coordination of this process will ensure that you have successful plants that can last throughout your growing season.