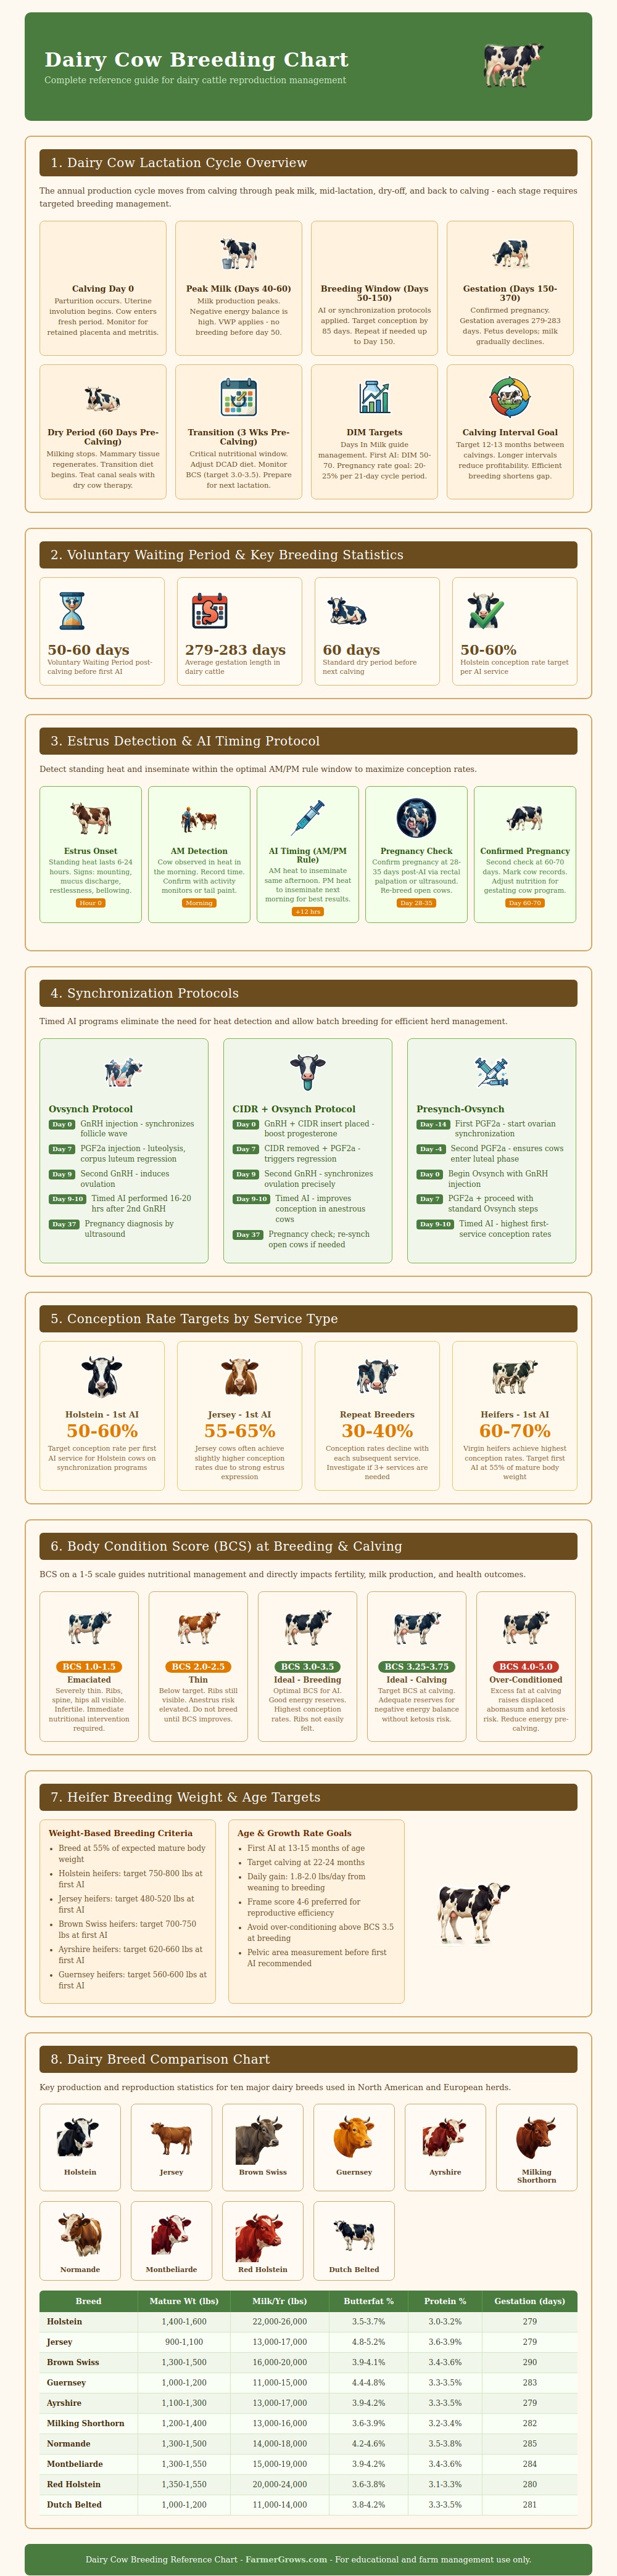
Breeding, for dairy farmers, is not a one-time choice. It is a series of timing decisions that starts when a cow calves and continues until she calve again. Get any link in this chain incorrect and you are going to have a bad year. Fourteen months vs. Twelve-month cycles will appear in your bulk tank long before they appears on the spreadsheet.
Patience is the first one. Easy to say, not always easy to do. Breed your fresh cow too soon and you set yourself up for disappointing conception rates, and also waste some semen. Wait too late and you’re stretching out that calving interval at the expense of production dollars. The standard practice seems to be settling on a voluntary waiting period of roughly fifty to sixty days then starting to closely monitor those heat signs. Why is that timeframe not arbitrary? Because that’s around the time that most cows has regained enough body reserves to sustain themselves through a new pregnancy and continued milk output.
Timing Your Dairy Breeding Choices
With heat detection, it’s all about the clock once she starts showing signs. You should inseminate them within 12 hours of the first obvious signs, though standing heat can lasts as little as 6 hours or up to 24 hours for some. The AM/PM rule is still good. It keeps everyone paying attention to when they actualy saw the activity instead of when they think they might have seen it. Tail paint and activity monitors help out more on larger herd, but walking the pens during the correct time of day are always necessary.
Alternatively, some farms skip heat detection altogether by using synchronization programs. By lining up their cows’ corpus luteum regression (and follicle wave) with hormone shots, they can breed all eligible cow according to a set calendar. This requires a certain degree of calendar discipline but it eliminates having to watch each cow every day. It’s particularly effective when your herd include cows who aren’t housed in a way that helps with reliable heat detection, or when you’re short-staffed. The tradeoff is cost and the need for careful record keeping to ensure no animal gets injected at the wrong time with the wrong thing.
Everything from here depends on body condition at the time of breeding. A cow that’s too light at service will be less likely to get bred and more prone to losing the baby down the line. One that’s too fat at calving faces metabolic issues that hurt calf health as well as her own. So, the target range lies in a relatively small window between three and three-and-a-half on the five-point scale. This score provide her with sufficient reserves to meet energy demands of the early lactation period while avoiding tipping over into fat cow syndrome territory. To prevent this gradual drift that can catch managers off guard six months from now, you check condition not just at the obvious times but routinely, all along.
Then there are heifers. These is bred not by a specific age but by weight that’s appropriate for their size. Since they are still growing, you don’t want the first lactation to overwhelm them. Ideally, they’ll be around fifty-five percent of their full-grown bodyweight when first served, which means it happens around thirteen to fifteen months of age. They can then calve out around twenty-two to twenty-four months and have plenty of time to complete their skeleton growth and produce a worthwhile second lactation within the same timeframe.
The general timeline is similar for all breeds; they just excel at different things. The volume talk is led by high producing Holsteins who are typically more demanding of nutrition and condition management. Jerseys tend to have better pregnancy rates with perhaps a little better heat expression, but their smaller size alters feeding and housing equations. All other breed are somewhere in between with unique blends of maturity size, fertility and milk components that a breeder considers relative to feed availability and market demand.
But again, with all breeding charts, the art comes from using them not like a script, but more like a map. You use them to understand how your milestones are positioned and why they’re there, but then you make day-to-day choices based off what’s in front of you (and inside) the cow, what the weather is doing, and what labor you have on hand that week. If the barn can align with the chart, then the twelve-month cycle becomes attainable rather than just an aspiration.