Candling quail egg involves using a light source to examine the contents of the quail eggs. By candling the eggs, one can determine which quail eggs is developing and which are not developing. Should you candle the quail eggs correctly, you can remove those that are not developing from the incubator to ensure that they dont create any problem for the developing quail eggs within the incubator.
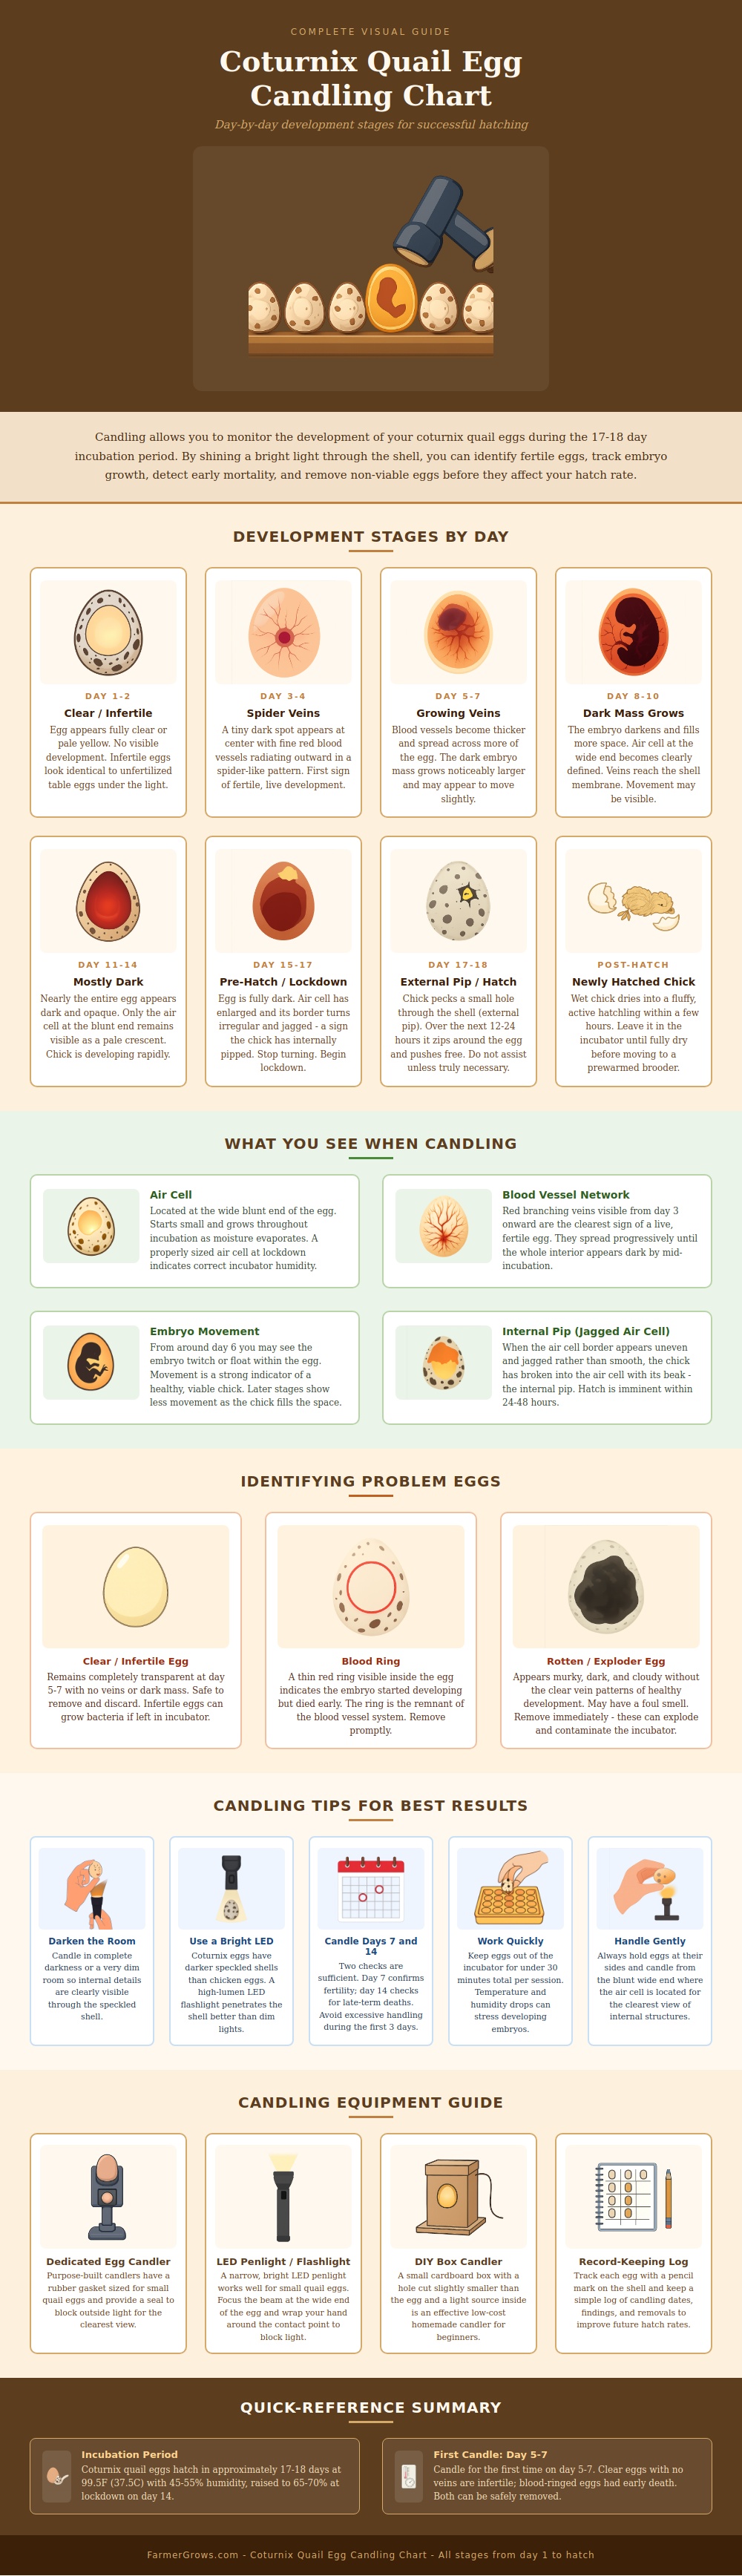
When candling quail eggs, light pass through the shell of the egg to reveal the contents of the shell. When candling an egg early in the incubation process, the egg will appear to be empty. After a few days of incubation, a small dark spot (the embryo) and fine red line within the egg will be visible.
How to Candle Quail Eggs
These lines are blood vessel that contain the developing embryo within the egg. In the middle of the second week of incubation, the interior of the egg will darken due to the developing embryo taking up more space within the shell of the egg. The blood vessels will also become more dens within the egg.
At the end of incubation, the egg shell will appear mostly opaque, but a pale pocket within the egg (the air cell) will be visible at the wide end of the egg. This air cell is a result of moisture leave the egg. If the air cell within the egg develops a jagged edge, it is a sign that the embryo is working to exit the air cell and pip outward from the shell.
Being able to identify these various visual indicator within the eggs is a necessity to remove those eggs from the incubator that will not be able to hatch. For example, if the egg becomes clear after the first week of incubation, it is likely an infertile egg. If the egg reveals a thin red ring after candling, it is another sign that the embryo within the egg has stopped developing.
You should remove these two types of eggs from the incubator so that the bacteria that could develop within these eggs will not effect the other eggs within the incubator. Additionally, any eggs that appear murky within the shell should be removed due to the fact that they has gone bad. Timing is important to the candling of the quail eggs.
If you candle the eggs too often, they may become stressed as a result of this. However, if the quail eggs are candled too infrequently, the problems within the incubator may go unnoticed for to long. Therefore, performing two candling sessions ensures that the eggs are inspected for potential problems.
The first session to inspect for developing embryos within the eggs, and the second after roughly a week of the first candling session. To perform these sessions in the darkest possible room using a strong light (instead of a weak flashlight) ensures that each egg can be properly inspected. Due to the speckled and thick nature of the quail egg shells, insufficient light will not reflect off of the eggs as enough to allow for viewing of the contents of the egg.
The humidity within which the eggs are incubated will impact the size of the air cell that is visible within each quail egg. Small air cells can result in difficulty for the embryo to move within the shell of the egg. Large air cells may indicate that the embryo has lost too much moisture within the shell.
It is easier to adjust the humidity levels within the incubator early in the incubation process rather than at the end of the incubation process. The size of the air cell is one visual indicator of whether or not the humidity level for the incubator were set correctly. The way in which you handle the eggs will affect the eggs and the results of candling them.
Always handle the eggs by their sides to reduce the chance that you will crack the shell. Always candle the eggs from the blunt side of the egg so that you can gain the best view of the air cell within the shell. Keep each candling session to thirty minute or less so that the incubator does not lose too much heat or humidity within the incubation process.
While candling the quail eggs can be of great benefit to the incubation process, some may be worried that candling the eggs will create any problems for the embryo. However, candling the eggs is less risky than leaving any potentially rotten egg within the incubator. That rotten egg could create problems for the other eggs.
Thus, candling the eggs allows for information to be gained about the development of the embryos within each shell. During the final days of incubation, you should leave the quail eggs alone unless you would like to confirm that the air cell within the egg has changed its shape. During this last stage of incubation, do not turn the eggs as it is possible to cause harm to the chicks that are within the egg.
After the final few days, when the chicks begin to external pip, the process is relatively quick. It may take the chick twelve to twenty-four hours to pip externally from its shell. Chicks will typically perform this process without assistance from human.
By candling the quail eggs, information can be gained about which eggs will hatch from the incubator, and which will not hatch from the incubator. Thus, information regarding the development of each of the eggs allows for the next incubation process to be more predictable.