Grow Light Distance Calculator
Estimate hanging height from fixture PPF, watts, beam angle, dimmer setting, target PPFD, canopy area, fixture count, reflector or lens loss, and a safety margin for crop-sensitive adjustments.
Choose a starting point, then edit any field. Presets combine realistic fixture output, dimming, crop stage, beam spread, area, loss, count, and margin assumptions.
Grow Light Distance Results
Results use fixture output, dimming, optical loss, beam geometry, safety margin, and canopy area to estimate a practical hanging height.
These comparison distances reuse your fixture settings and solve for common crop PPFD targets, so you can compare seedling, leafy, herb, and fruiting setups quickly.
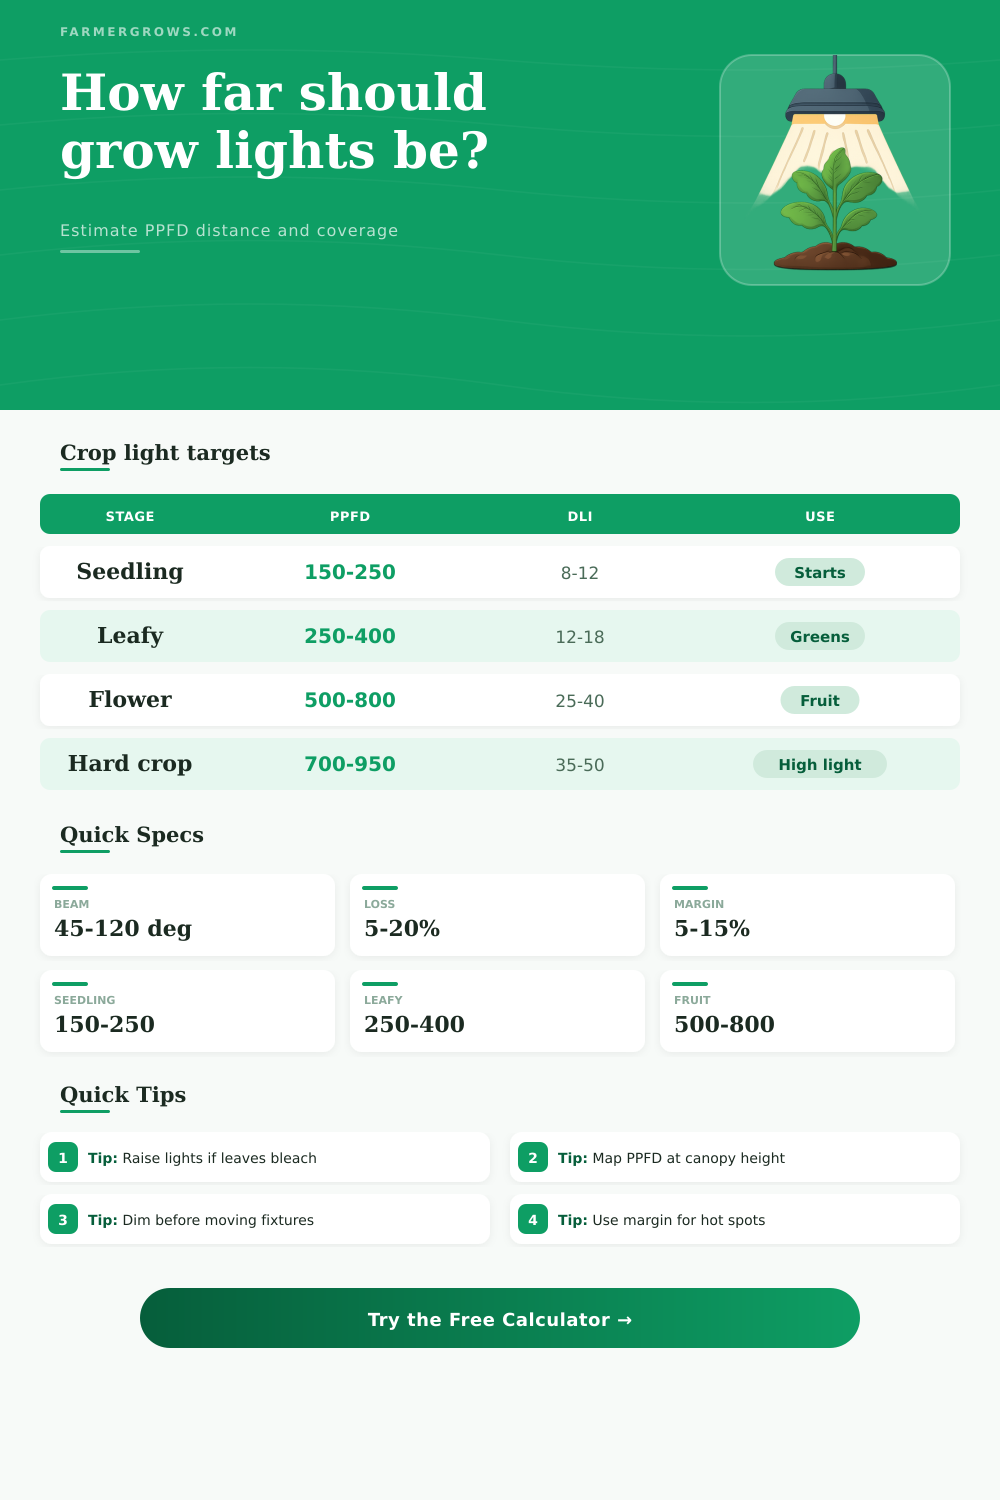
| Crop stage | Common PPFD range | Approx DLI at 16 h | Distance note |
|---|---|---|---|
| Seedling or clone | 100 to 250 | 6 to 14 mol/m²/day | Start high or dimmed to prevent stretch and bleaching |
| Microgreens | 150 to 300 | 9 to 17 mol/m²/day | Uniform shelf coverage matters more than extreme intensity |
| Leafy greens | 250 to 450 | 14 to 26 mol/m²/day | Keep enough height to avoid edge-to-center striping |
| Culinary herbs | 350 to 550 | 20 to 32 mol/m²/day | Many herbs tolerate moderate intensity with airflow |
| Vegetative growth | 400 to 650 | 23 to 37 mol/m²/day | Use wider coverage before pushing intensity |
| Flowering or fruiting | 500 to 850 | 29 to 49 mol/m²/day | Check leaf temperature and PPFD map at canopy |
| High-light crops | 700 to 1000 | 40 to 58 mol/m²/day | Often needs CO², airflow, nutrition, and monitoring |
| Fixture type | Typical watts | Typical PPF | Planning note |
|---|---|---|---|
| LED seedling strip | 20 to 80 W | 40 to 180 | Usually close-mounted and dimmed by distance |
| LED shelf bar | 60 to 160 W | 130 to 430 | Good for greens, microgreens, starts, and herbs |
| Square LED board | 120 to 300 W | 300 to 850 | Common in small tents and compact beds |
| Bar-style LED array | 300 to 800 W | 800 to 2200 | Better uniformity over wide canopies |
| Ceramic metal halide | 315 to 630 W | 500 to 1200 | Reflector shape strongly affects distance |
| High pressure sodium | 400 to 1000 W | 700 to 1900 | Needs heat clearance and reflector-aware spacing |
| Beam angle | Footprint style | At 18 in height | Use case |
|---|---|---|---|
| 30 to 45 degrees | Narrow spot | 0.8 to 1.5 ft diameter | Deep canopy or high bay supplemental light |
| 60 degrees | Medium cone | 1.7 ft diameter | Focused panels, lenses, reflector fixtures |
| 90 degrees | Wide cone | 3.0 ft diameter | General grow tents and benches |
| 110 to 120 degrees | Very wide | 4.3 to 5.2 ft diameter | Bar lights, shelf strips, broad canopies |
| Diffuse no-lens LED | Broad spread | Depends on diode layout | Use PPFD mapping for final height |
| Change | Approx effect | What to do | Why it matters |
|---|---|---|---|
| Double distance | PPFD near one quarter | Use only when coverage needs are high | Inverse-square behavior lowers intensity quickly |
| Increase dimmer 25% | PPFD rises 25% | Raise slightly or monitor canopy response | Output changes linearly with dimmer setting |
| Add 10% lens loss | PPFD falls 10% | Clean lens or lower fixture slightly | Dirt and covers reduce photons reaching plants |
| Use wider beam | Lower center PPFD | Hang closer or add fixture count | Photons spread over more canopy area |
| Use more fixtures | Higher total PPF | Raise lights for uniform overlap | Overlap can smooth hot and dim zones |
| Add safety margin | Recommended height rises | Fine tune after canopy PPFD check | Protects sensitive crops from hot spots |
Growing plants with artificial light require an understanding of physics and judgment. The most important question to ask is how far to hang the light fixture from the plants. If the light fixture hang too high from the plants, the plants will experience slow growth.
If the light fixture hangs too low from the plants, the plants may bleach. The answer to this question depends on a few factors: the crop to be grown, the type of light fixture to be used, and the dimmer settings to be used on that fixture. Light radiate in three dimensions.
How High to Hang Grow Lights Above Plants
The distance from the source of light to the object being illuminated affects how much light is delivered to that object. The further the light source is from the object, the less intense the light that reaches the object. The shape of the beam of light from the source also has an effect on how the intensity of light decreases with distance.
Two light fixtures that are identical in each way may have different beam angles. Therefore, one light fixture may shine most of its light on a small portion of the plants, while the other light fixture may distribute its light more evenly across the plants. A calculator can help determine the hanging height of the light fixture above the plants given information about the light fixture and the plants to be grown.
However, the individual must understand the variable required to be entered into the calculation. The first variable that the calculator will use is the output of the light fixture. The published PPFD for the light fixture is one way to determine the output of the fixture.
An alternative is to estimate the output of the light fixture based on its wattage and the efficacy of the light. The manufacturer of the light fixture publishes the PPFD that relates to the actual diode and optics of the light fixture. However, the estimated output based on wattage may not match the actual output of the light fixture.
Yet, the difference in these two variables is small in most instances. Under the worst conditions, though, the difference between the two values may be as great as the safety margin for light intensity that the grower plan to use. The second variable is the beam angle of the light fixture.
A narrow beam will emit most of its light into a small circle. This increases the intensity of light falling on the area in the center of that circle. However, it may leave the edges of the plants in the dark unless more light fixture are added.
A wide beam will distribute most of the light from the fixture over a larger area, which may reduce the intensity at the center of the plants canopy but may improve even distribution of light to the plants’ canopy. The calculator will determine the distance from the plants at which the light intensity will reach the target intensity. The calculator will use the beam angle of the light fixture to determine if the distance calculated will reach the entire area of the plants’ canopy.
If the light beam may not reach the entire area of the plants’ canopy, the grower will increase the hanging height of the fixture above the plants in the suggested value for the height of the light. The third variable in many cases is the intensity of the light fixture. If the light fixture is set to seventy percent of its output setting, the intensity of the light will not be seventy percent of its potential at any distance from the plants.
The cone of light will be mathematically calculated to determine at what distance the target light intensity will be reached. However, that distance calculated without accounting for the seventy percent output of the lights will be too short for the plants. It will be necessary to raise the height of the light fixtures above the plants.
Other factors, such as the cleanliness of the lens of the light fixture, the wear on the reflectors of the light fixture, and the hardware used to suspend the light fixture from the grow space will also reduce the intensity of light that reaches the plants. Using a field to account for the losses of light caused by these factors will permit for the grower to honestly account for the light budget of the growing space. The safety margin is another setting that may be included in the calculations.
Many may choose to skip this setting. However, the safety margin is important. The safety margin for the intensity of light that falls on the plants will increase the target intensity that the distance calculation performs.
Therefore, the suggested distance for hanging the light fixture will be higher. Using a higher hanging distance for the light fixture from the plants will ensure that the center of the plants do not experience a hot spot of light under the LEDs of the light fixture. The safety margin for growing light is not wasted light.
It acts as an insurance policy in case the plants do not all receive the same angle of light and if the angle of the leaves does not remain the same throughout the period of growing the plants. A ten percent safety margin may allow for headroom in the grow space for the grower to avoid having to readjust the height of the light fixtures every week. The stage of the plants also has an effect on the intensity of light that should be provided to the plants.
Seedlings and microgreens usually grow best with less intense light than flowering plants. Therefore, when growing seedlings, the light fixture can be placed closer to the plants to ensure that the seedlings dont receive too much intense light. For flowering and fruiting plants, though, the intensity of the artificial light should be increased, and the height of the light fixture should be lowered.
The real world may contain variables that cannot be accounted for in the calculations. For example, the reflectivity of the walls of the grow space, airflow in the grow space, and the temperature of the light fixture may affect the amount of light that the plants use. If the walls of the grow space are cleaned white walls, the white walls will reflect some of the light that the plants emit back into the plants.
This increases the intensity of light that reaches the plants. Poor airflow in the grow space may increase the temperature at which the leaves of the plants reach heat saturation. Therefore, two identical growing rooms with the same types of light fixtures may require different hanging heights for the light fixtures from the plants.
It is also necessary to measure the light intensity after installing the light fixture. The distance indicated by the calculator may not account for many variables of the grow space. A handheld light meter may be used to gauge the light intensity throughout the grow space once the plants have been installed into the growing area.
Using a handheld meter will reveal whether or not the plants that are on the edges of the grow space are receiving the same intensity of light as those in the center of the plants canopy. Based on the measurements of the growing area with the handheld meter, the grower can decide whether to raise the hanging height of the light fixture or to add more light fixtures to the area in which the plants are growing. The third check that should be performed is to measure the temperature of the plants’ canopy.
If the leaves of the plants are warm to the touch, the plants are absorbing too much light. This is in part due to the heat that is emitted by the growing light fixtures. Raising the hanging height of the light fixture a few inches will resolve the issue of both the intensity and the heat of the light falling on the plants leaves.
The grower will eventually develop an understanding of the behaviors of the light fixtures. During the first cycle of the growing period with the newly purchased light fixtures, the grower will observe the settings and behavior of the lights. After this first cycle, though, the grower will be able to reliably and predictably use the light fixtures.
Their knowledge will include the amount of overlap that the beam of light must travel through in order to allow the plants to grow and the amount of light intensity that the plants can take before the leaves of the plants begin to lighten due to too much artificial light. While the calculator will provide the grower with a set of numbers to begin the growing process, the grower will learn more with a handheld meter while the plants are growing.