💧 Drip Irrigation Calculator
Calculate tubing length, emitter count, mulch coverage, and water flow for your drip irrigation system
| Depth | Sq Ft per Cubic Yard | Sq M per Cubic Meter | Bags (2 cu ft) per Yard |
|---|---|---|---|
| 1 in (2.5 cm) | 324 sq ft | 36 m² | 13.5 |
| 2 in (5 cm) | 162 sq ft | 18 m² | 13.5 |
| 3 in (7.6 cm) | 108 sq ft | 12 m² | 13.5 |
| 4 in (10 cm) | 81 sq ft | 9 m² | 13.5 |
| 6 in (15 cm) | 54 sq ft | 6 m² | 13.5 |
| Material | Weight (lbs/yd³) | Weight (kg/m³) | Notes |
|---|---|---|---|
| Hardwood Bark | 400–600 | 240–360 | Heaviest, best for slopes |
| Cedar Mulch | 350–450 | 210–270 | Naturally pest resistant |
| Cypress Mulch | 350–500 | 210–300 | Holds moisture well |
| Pine Bark | 300–450 | 180–270 | Lightweight, acidic |
| Pine Straw | 200–350 | 120–210 | Very lightweight |
| Rubber Mulch | 1,000–1,400 | 600–840 | Extremely heavy |
| Compost Mulch | 800–1,100 | 480–660 | Dense, nutrient rich |
| Wood Chips | 350–550 | 210–330 | Varies by wood species |
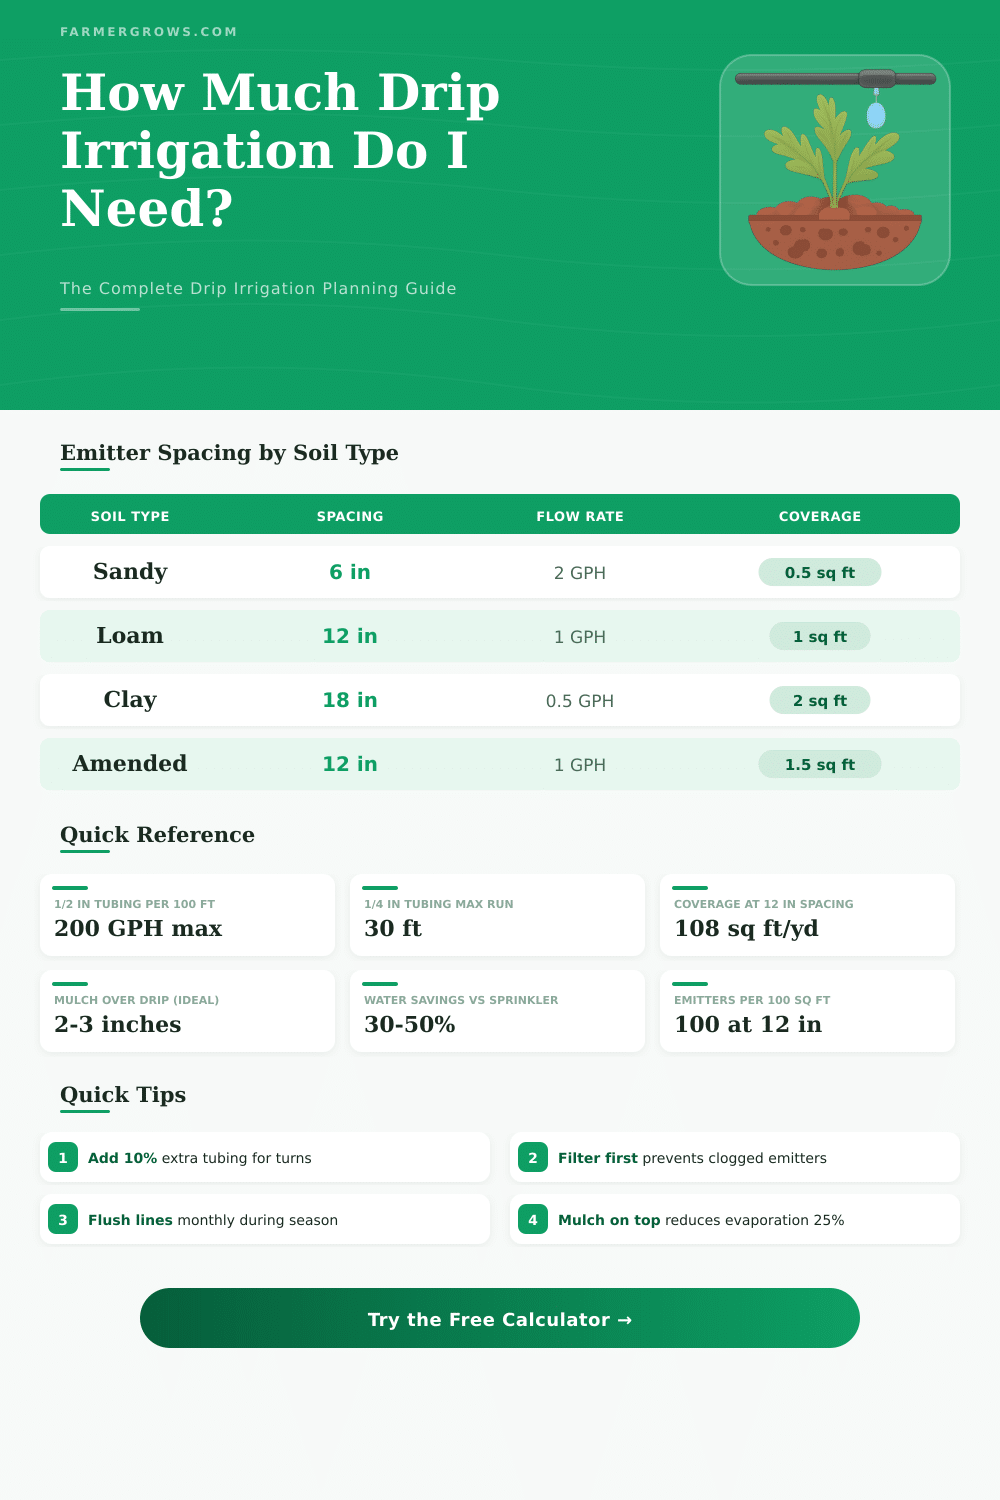
| Soil Type | Emitter Spacing | Row Spacing | Flow Rate Recommendation |
|---|---|---|---|
| Sandy | 6–9 in (15–23 cm) | 9–12 in (23–30 cm) | 2.0 GPH (7.6 LPH) |
| Loam | 12 in (30 cm) | 12–18 in (30–45 cm) | 1.0 GPH (3.8 LPH) |
| Clay | 18 in (45 cm) | 18–24 in (45–60 cm) | 0.5 GPH (1.9 LPH) |
| Amended Mix | 12 in (30 cm) | 12–18 in (30–45 cm) | 1.0 GPH (3.8 LPH) |
| Bag Size | Volume per Bag | Bags per Cubic Yard | Coverage at 3 in Depth |
|---|---|---|---|
| 2 cu ft bag | 0.074 yd³ | 13.5 bags | 8 sq ft |
| 3 cu ft bag | 0.111 yd³ | 9 bags | 12 sq ft |
| 1 cu yd bulk | 27 cu ft | 1 yard | 108 sq ft |
| 1 cu m bulk | 35.3 cu ft | 1.31 yards | 141 sq ft |
| Project | Area | Tubing (12″ rows) | Mulch at 3 in |
|---|---|---|---|
| Small Veggie Bed | 40 sq ft (3.7 m²) | 40 ft (12 m) | 0.37 yd³ |
| Raised Bed 4×8 | 32 sq ft (3 m²) | 32 ft (10 m) | 0.30 yd³ |
| Flower Garden | 200 sq ft (18.6 m²) | 200 ft (61 m) | 1.85 yd³ |
| Shrub Border | 300 sq ft (27.9 m²) | 200 ft (61 m) | 2.78 yd³ |
| Large Landscape | 1,000 sq ft (92.9 m²) | 670 ft (204 m) | 9.26 yd³ |
| Full Yard | 2,500 sq ft (232 m²) | 1,670 ft (509 m) | 23.15 yd³ |
Drip Irrigation is a key system that saves water and nutrients by means of slow flow directly to the roots of the plant. It can provide water from the surface or from the depth. Like this one ensures that the water arrives exactly in the root zone, where it truly is useful.
In dry areas, as landscape beds, vegetable gardens or plantations in jars, drip Irrigation gives excellent results, while it seriously reduces the waste of water.
Why Use Drip Irrigation
The system delivers water and nutrients directly to the roots of every plant zone in controlled amounts and in the right intervals. Every plant receives exactly that, what it requires to grow. Water flows step by step in the ground through plastic tubes equipped with special outlets called emitters, and it goes directly over there, where the roots expect it.
Thanks to that direct delivery method, drip Irrigation reaches more than 90 percent efficiency. This truly impresses compared with the waste of water in other methods.
Drip Irrigation beats old methods like central pivot sprinklers or flood watering, and the differences are clear. A gardener can improve the water use up to 70 percent and cut the energy costs relatively easily. The system stops loss of water from evaporation, dripping and excessive seeping, that troubles traditional ones.
It gives water in controlled fashion and in slower rhythm, so that the soil has enough time to absorb it before the dripping starts.
Here another useful point, you will have fewer unwanted grasses. Because the water targets only the base of the plant, the intervals between them stay dry. Sprinklers wet everything without distinction, included those unwanted grasses, that grow between.
Drip systems almost do not mind anything except the plant itself. That alone makes the garden work much more simple.
The main disadvantage? Clogs happen. Narrow tubes and emitters can gather deposits, mineral buildup or garbage during the time.
That reduces the water flow and causes uneven watering. Cheap emitters commonly fail after some years; or they jam entirely or start too tip water everywhere. To keep a drip system running smooth, you need regular checks and attention, to protect your expense.
Soaker tubes spill water continuously along their whole length, during drip tubes deliver it exactly to the roots by means of intended emitters. Various types of emitters answer for different targets. Button droppers work well for beds and little jars.
Bigger emitters are better for big cabinets. You have also pressure-compensating variants and basic drip emitters to choose according to your setup.
Here the money side, drip Irrigation ranks between the most friendly to the pocket. The installation costs between around 2.50 and 4.50 each foot, included of work. Doing it yourself is not difficult.
Drip method plays well while one spreads to big gardens. The result? Drip Irrigation helps gardeners save water, improve the health of the soil and increase the output of crops tosatisfy the real needs of food.