Microgreens Yield Calculator
Estimate fresh harvest weight, seed needed, yield per tray, and crop timing from real microgreens seeding densities, tray size, germination, harvest cut, and loss.
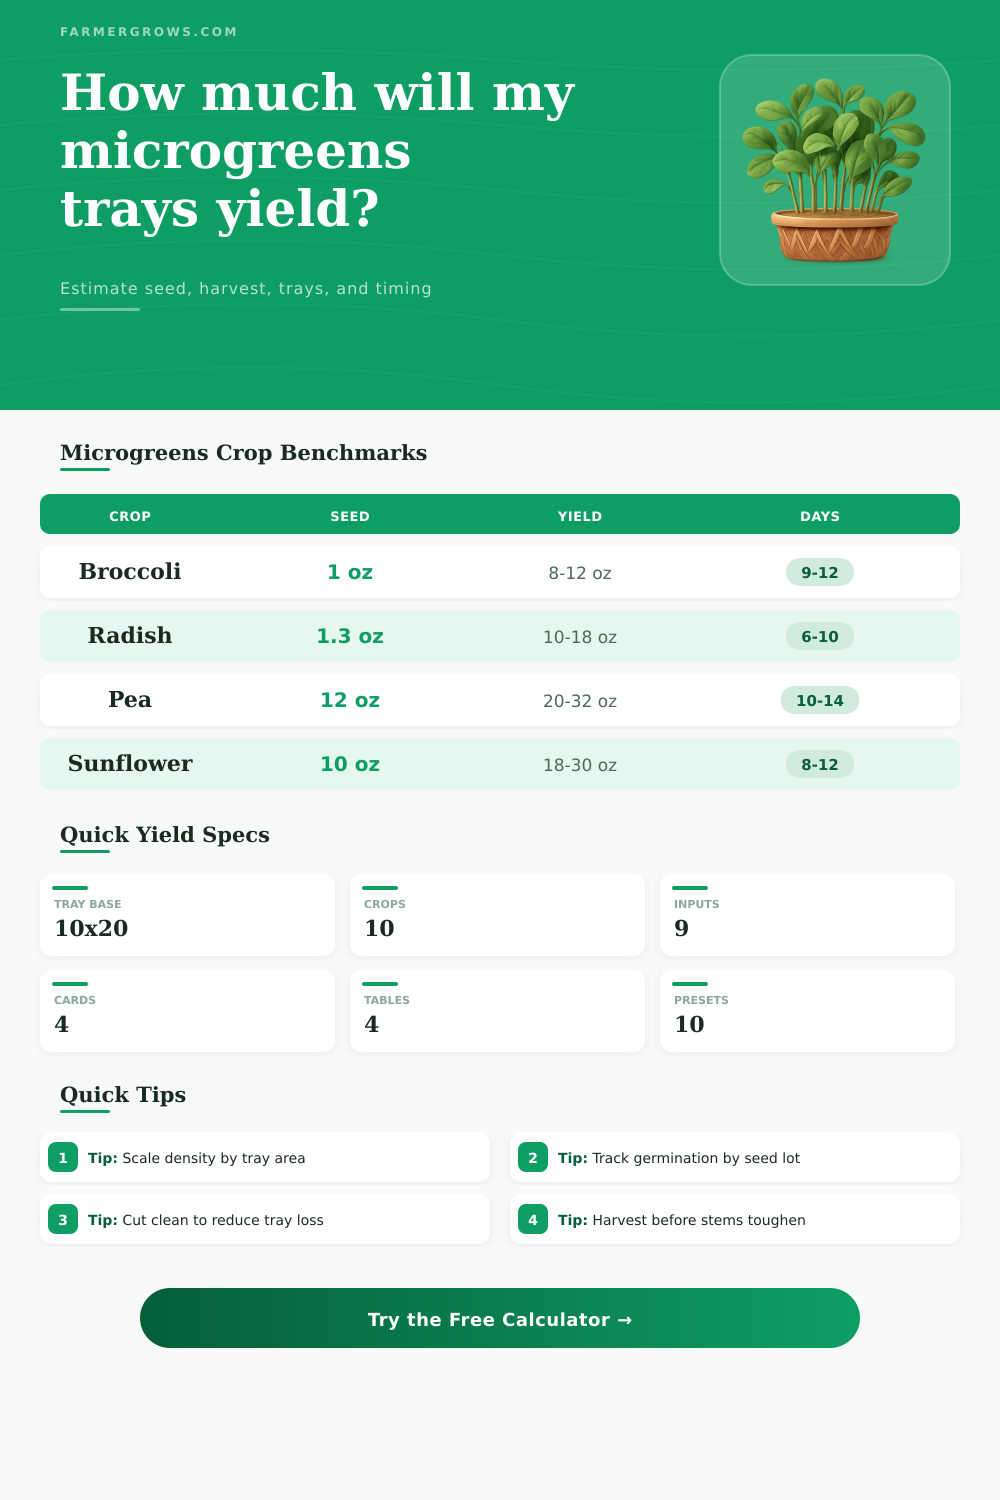
Crop benchmarks are expressed per standard 10x20 nursery tray. Custom trays scale by growing area, so a 5x5 sample tray, 10x10 half tray, shallow 1020, or metric tray can all be compared on the same basis.
Microgreens Batch Estimate
Your tray yield estimate will appear here after calculation.
| Crop | Seed density per 10x20 | Typical yield per 10x20 | Blackout | Grow days |
|---|---|---|---|---|
| Broccoli | 0.8-1.2 oz | 8-12 oz | 3-4 days | 9-12 days |
| Radish | 1.0-1.5 oz | 10-18 oz | 2-3 days | 6-10 days |
| Pea shoots | 10-16 oz | 20-32 oz | 3-5 days | 10-14 days |
| Sunflower shoots | 8-12 oz | 18-30 oz | 3-4 days | 8-12 days |
| Wheatgrass | 8-12 oz | 18-28 oz | 2-3 days | 7-10 days |
| Arugula | 0.4-0.7 oz | 5-9 oz | 3-4 days | 8-12 days |
| Mustard | 0.7-1.1 oz | 7-12 oz | 2-3 days | 7-10 days |
| Basil | 0.5-0.8 oz | 4-8 oz | 4-6 days | 18-25 days |
| Cilantro | 2.0-3.0 oz | 5-10 oz | 5-7 days | 18-25 days |
| Kale | 0.8-1.2 oz | 7-11 oz | 3-4 days | 9-12 days |
| Tray | Area | 1020 factor | Use case | Density note |
|---|---|---|---|---|
| 5x5 sample tray | 25 in² | 0.125x | Seed lot tests | Use one eighth of 1020 seed |
| 10x10 half tray | 100 in² | 0.50x | Small crop trials | Use half of 1020 seed |
| 10x20 standard tray | 200 in² | 1.00x | Common production flat | Use listed density |
| 12x24 large tray | 288 in² | 1.44x | Wider rack systems | Multiply seed by 1.44 |
| 30x50 cm tray | 232.5 in² | 1.16x | Metric greenhouse tray | Multiply seed by 1.16 |
| Crop group | Blackout target | Light finish | Watch point | Yield effect |
|---|---|---|---|---|
| Brassicas | 3-4 days | 5-8 days | Even green cotyledons | Stable if cut in window |
| Radish and mustard | 2-3 days | 4-7 days | Stem length and heat | Falls if stems toughen |
| Pea and sunflower | 3-5 days | 5-9 days | Hull drop and root mat | Heavy yield with airflow |
| Herbs | 4-7 days | 12-19 days | Slow emergence | Lower weight, higher value crop |
| Process condition | Harvest cut | Loss range | Best for | Calculator impact |
|---|---|---|---|---|
| Very clean dry harvest | 96-99% | 3-6% | Broccoli, kale, arugula | Highest packed yield |
| Normal packed harvest | 92-97% | 6-10% | Most weekly batches | Balanced default |
| Hull-heavy harvest | 88-95% | 10-16% | Sunflower, buckwheat | Lower after cleaning |
| Wet or uneven stand | 80-92% | 12-25% | Recovery batches | Conservative estimate |
Density check: If trays are thin, raise seed density only within the crop range first. Past the high end, airflow and disease risk often rise faster than harvest weight.
Batch tracking: Save your actual harvest, germination, and loss for each seed lot. After three batches, use your farm average instead of the broad reference range.
A yield calculator estimate the weight of a harvest and the amount of seed require for that harvest. The yield calculator take many variables of a crop and compines them into a single estimation of the potential yield of that crop. You can use a yield calculator to plan your rack space, your order timing, and your delivery price.
The inputs for a yield calculator include information about the dimension of the tray in which you will plant your seeds, the density of the seeds you will plant into the tray, the germination percentage of your seeds, and the length of time the seeds will grow. The dimensions of the tray impact the amount of area for your seeds, as well as the weight of your harvest. The density of the seeds is the amount of dry seed that you place into your tray.
How to Use a Yield Calculator
While increasing the density will increase the weight of your canopy, planting too many seeds will decrease the amount of airflow to your plants, which will reduce the benefit of increasing the number of seeds you plant in your tray. The germination percentage will impact the total weight of your crop, as a lower percentage of seeds will sprout and grow into plant that contain the genetic information to produce the weight of the seed. The length of time that the plants grow will impact the weight of the harvest, as plants of the same variety will grow at different rate over time.
Factors like blackout days will impact the growth of your plants, as insufficient blackouts will lead to insufficient root development and stem elongation. Too little time during blackouts will lead to a light canopy of plants, while too much time will lead to weak stem or the development of diseases of your plants. Additionally, the total number of days that your plants grow will impact the total length of your growing season.
Each crop take a different amount of time to grow its usable leaf mass. Finally, the number of grow days will determine the raw weight of your harvest. The number of grow days will adjust the raw yield of the crop.
Fields for the cut rate and post-harvest loss are include in the yield calculator. The cut rate is the amount of plant canopy that will remain in the tray after cutting the crops. A very clean cut will result in very little canopy remaining in the tray.
Post-harvest loss is the weight of the plants after they leave the tray of plants. Some of the reasons for the loss of weight of the plants are due to hull removal, washing the plants to adjust for moisture, and trimming the plants. While the loss of weight of individual plants in a tray may be minimal, the loss of weight of plants from many tray will be significant.
High rates of post-harvest loss mean that more seed will be required to achieve the same amount of packed weight. Reference tables are included that describe the typical range in which the variables should fall. These reference tables include information about the typical range for the seed weights for each crop, the typical range for blackout days, and the typical grow day span.
For each of the variables, the yield calculator will provide a score of how closely the chosen variable fall within the normal range. The score provided for each variable is not the grade for that variable, but a signal of how far the choice of that variable differ from the conditions that resulted in the benchmark weights for that crop. Using the yield calculator, you can compare the outcomes of changing one variable at a time.
You can compare scenarios in which you change only the seed density, or scenarios in which you change only the loss percentage. By comparing the outcomes of different scenarios, it is possible to understand how each variable will impact the outcome of your harvest. By comparing these outcomes to the actual weights of your harvests, it is possible to find the default setting for your farm.
Many people make mistakes with the settings of the yield calculator. One common mistake is treating the published seed density as a target instead of a range. Another common mistake is underestimating the percentage rate of post-harvest loss.
Both of these mistakes will result in the planning of the amount of finished weight of the plants to be higher than the weight of the plants that will be packed. To avoid these mistakes, you can set the yield calculator to use a higher percentage for post-harvest loss to see if the resulting total expected weight match that of previous batches of plants. While the yield calculator is helpful in determining the amount of weight that your plants will achieve during harvest, it should not replace the observation that you and your harvest team can make of the plants themselves.
The yield calculator will provide the range of weights for the plants based on the average timing of growth of the plants. However, it is up to your eyes and your hands to determine whether or not your plants are ready for harvest. While the yield calculator will provide an estimate of the weight of your plants, your observation will provide information to you regarding whether or not the growing conditions for the plants match the estimates of the weight that those plants will achieve.
Using the two tools will allow you to make the best possible decision regarding your plants. By using the yield calculator prior to seeding your plants, you will have a better understanding of how many trays of plants you will need, how dense you should grow your plants, and how much loss you can expect from your plants during the growing process. Using the yield calculator will help you to avoid over-ordering the amount of seed that you will need for your plants, as well as help you to avoid instances where you may experience shortage in the amount of seed that your plants will produce.