Pole Barn Lighting Calculator
Estimate fixture count, spacing, delivered brightness, and energy use for a pole barn. Compare use cases, beam angles, and mounting heights before you buy.
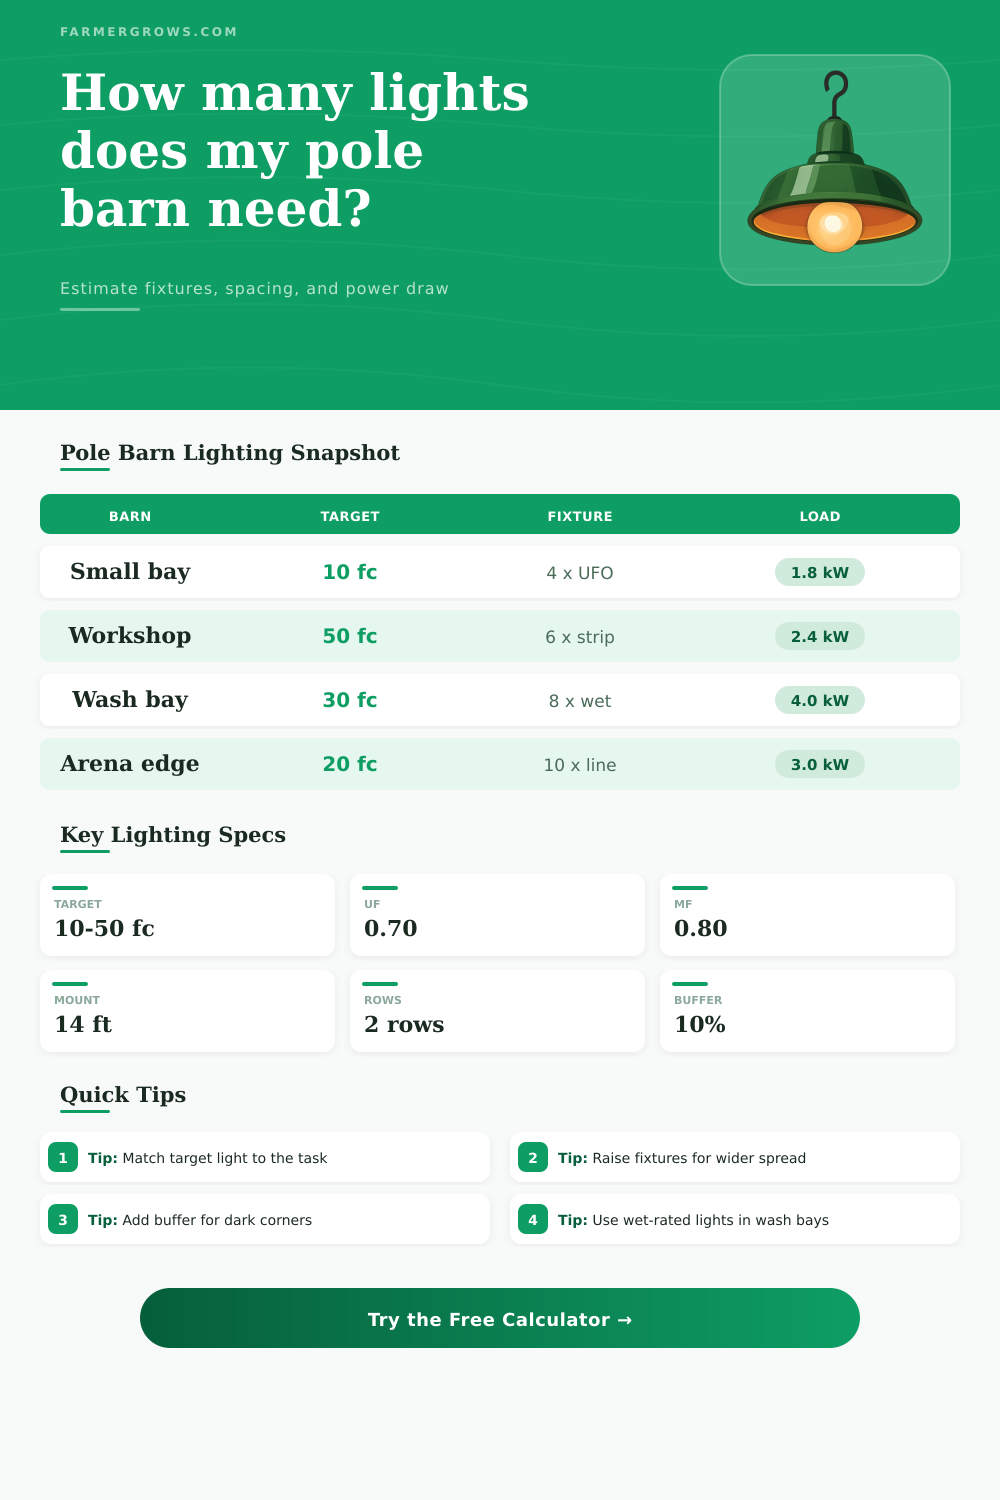
Pick a real barn use to preload target brightness, fixture output, beam angle, and runtime. Each preset gives a practical layout starting point for storage, work, and livestock spaces.
Lighting Results
These values use the current barn use, fixture family, and mounting height. The layout summary shows both light level and practical spacing so you can plan the install.
| Use | Foot-candles | Lux | Note |
|---|---|---|---|
| Storage | 5 to 10 | 54 to 108 | Low traffic |
| Workshop | 30 to 50 | 323 to 538 | Task work |
| Wash bay | 25 to 35 | 269 to 377 | Wet rated |
| Livestock | 10 to 15 | 108 to 161 | Soft even light |
| Fixture | Lumens | Watts | Beam |
|---|---|---|---|
| 150W UFO | 22,500 | 150 | 90° |
| 200W UFO | 30,000 | 200 | 90° |
| 120W strip | 16,800 | 120 | 120° |
| Wet light | 19,500 | 150 | 100° |
| Clear height | Mount | Rows | Tip |
|---|---|---|---|
| 10 to 12 ft | 8 to 10 ft | 1 to 2 | Use broad beam |
| 12 to 16 ft | 10 to 12 ft | 2 to 3 | Best all-around |
| 16 to 20 ft | 12 to 15 ft | 3 to 4 | Use even grid |
| 20 ft plus | 15 ft plus | 4 plus | Check glare |
Use the highest task target only where you need it, then var storage zones stay softer to reduce wattage and glare.
Wider beam angles cover more floor area, but mounting height and reflectance still shape how even the barn feels at night.
Pole barn lighting is essential for an workspace. The pole barn lighting should allow the worker to perform there tasks with enough visibility. Many people realizes that lighting within a pole barn dont simply involve flipping a switch to turn on the lights.
Instead, the lighting must allow the individuals within the pole barn to see their tasks clear without straining their eyes or creating a potential for accidents. Pole barns have many uses that is significantly different than residential properties like living rooms. The lighting needs of a pole barn used to store hay or haybales are different from a pole barn used to house livestock or to perform task in a workshop.
How to Light a Pole Barn
The brightness of the lighting in the pole barn should be based off the use of the pole barn. Storage areas will require lights with low brightness because people only use these areas to find items. Workshop areas will need bright lights to allow the worker to focus on the tasks they are to perform.
Livestock areas requires lights that is gentle on the animals so the lighting does not startle them. However, livestock areas should have lighting that is consistent so the animals do not feel uncomfortably while being fed. Wash bays require specialized lighting so the water does not damage the lighting fixture.
Foot-candles and lux are two units of measurement for the amount of light that falls on the floor within the pole barn. Using too little light of brightness will make it difficult for the individuals within the pole barn to perform their tasks. Using too much light will cause glare off of the metal structure within the pole barn.
The mounting height of the lighting will determine the area that will be lighted within the pole barn. Mounting the lights higher will allow the light to cover a larger area within the barn. However, mounting the lights at a lower height will allow the light to be more focused on a certain area within the pole barn.
The beam angle of the lighting will determine the spread of light within the barn. A wide beam will illuminate the main floor of the barn. A narrow beam will only light certain corner of the pole barn.
The utilization factor will determine how much of the light shines on the floor of the barn as opposed to the rafters. The maintenance factor will account for the fact that light bulbs will dim over time and the lenses will accumulate dust over time, which will reduce the amount of light that pass through the lenses. For instance, a workshop that is thirty feet wide and forty feet long should have fifty foot-candles at the workbench.
You should install two rows of two-hundred-watt UFO high bay light fixtures twenty feet apart from each other. Using UFO high bay lights will prevent hot spot within the workshop. Additionally, UFO lights will use less electricity than other type of lighting for the workshop.
Using linear strip lights would also work well for lighting the workshop; however, the lights will have to be installed closer to each other. Energy consumption is a major consideration when lighting a pole barn. The number of hour the lights are on and the wattage of the lights will determine the cost of the electricity that powers the lighting fixtures within a pole barn.
The lighting circuits should be planned so that the lighting fixtures do not overload the circuits. It is also essential to plan for a buffer in the lighting plan. A buffer of ten or fifteen percent will allow the lighting fixtures to focus on any dark corner of the pole barn or to allow for the expansion of the pole barn in the future.
There are some mistakes that people will make when lighting a pole barn. Using lights of equal brightness throughout the pole barn when some area need more light than others. For instance, a workshop area requires more brightness than a storage area for haybales.
The color of the walls and their material will impact the lighting within the pole barn. Dark walls will absorb light and white walls will reflect the light. The environment within the pole barn will also impact the lighting within the barn.
For example, any dust within the workshop will settle on the lenses of the lighting fixtures. Any moisture within the wash bay will corrode the lighting fixtures. To successfully install lighting within a pole barn, the worker should walk through the pole barn to see if there are any obstructions to the placement of the lighting fixtures.
Motion sensors can be placed in areas that are not used often within a pole barn. Using motion sensors will save money on the electricity consumption of the pole barn. Finally, when choosing the lighting fixtures for the pole barn, choose the angle of the lights to minimize the glare of the lights.
Glare can be uncomfortable for humans and stressful for the livestock within the pole barn.