Button quail eggs is very small. Furthermore, button quail eggs require precise conditions for the embryo to develop into a chick. Button quail eggs needs warmth to incubate the embryo inside of the egg.
Button quail eggs need the correct moisture levels to allow for the proper development of an embryo inside the button quail egg. Button quail eggs also require movement for the embryo to develop proper. If button quail eggs doesnt contain these important element, then the embryo inside the button quail egg may not successfully develop into a button quail chick, or the embryo may not be able to exit the shell once it has reached it’s developmental stage.
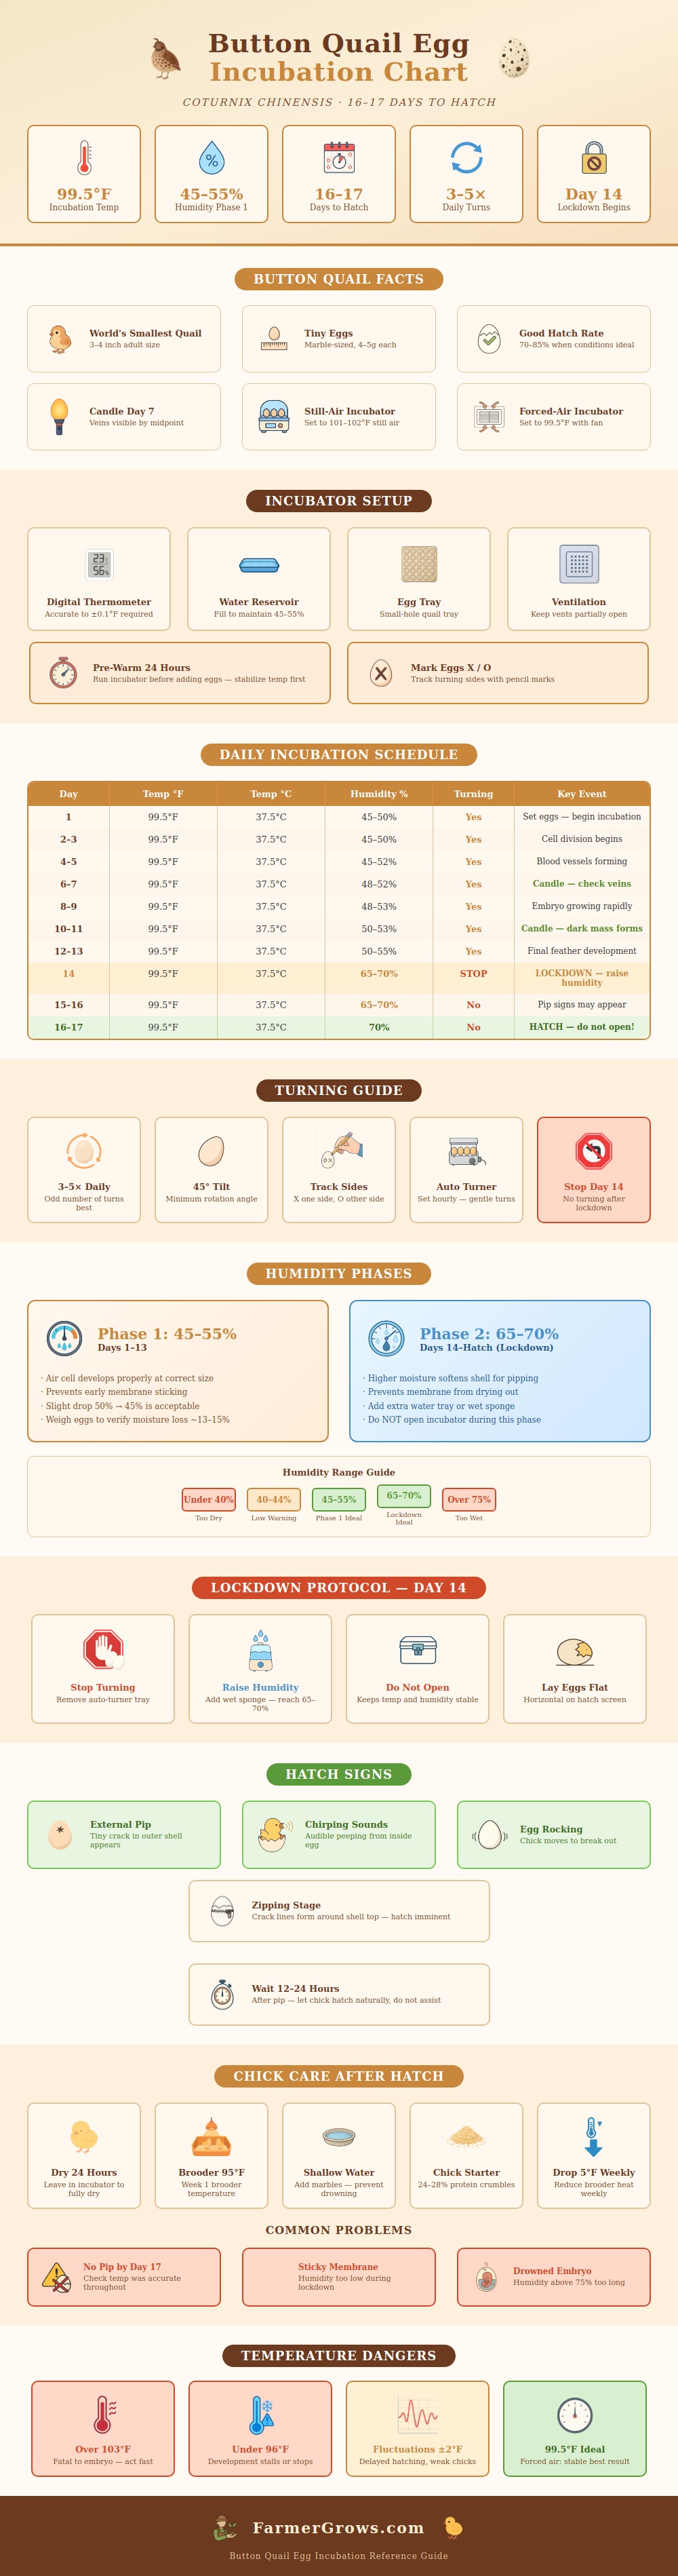
How to Incubate and Hatch Button Quail Eggs
The incubation process for button quail eggs require that the temperature remains stable and that the humidity within the incubator change at a specific point in the incubation process. Humidity within the incubator must change at a specific point in the incubation process because high humidity is required in the final stage of incubation to prevent the membrane inside of the button quail egg from drying out. Furthermore, humidity should be increased around day fourteen of incubation, and at this stage in the incubation process the button quail eggs should stop being turned.
Following the stages of incubation noted on an incubation chart for button quail eggs will ensure that the button quail chicks is successful in developing and that none of the chicks are weak or stuck on the shell. Prior to placing the button quail eggs inside of the incubator, it is necessary to prepare the incubator. For example, you should place the incubator for a period of one full day prior to placing the button quail eggs inside of the incubator.
This ensures that the temperature within the incubator is stable. Furthermore, it is important to make sure that the temperature within the incubator is stable because button quail eggs can quickly respond to changes in the temperature of the button quail eggs. It is also necessary to ensure that the incubator contains water trays to maintain humidity within the incubator, to ensure that the egg rack include small holes to prevent the button quail eggs from slipping through the holes in the incubator, and to ensure that the incubator includes ventilation to allow for fresh air to reach the embryos inside of the button quail eggs, but to not allow for heat to leave the incubator too quick.
Turning the button quail eggs is a step that is necessary to ensure that the embryo does not stick to one side of the shell during the incubation process. For example, the button quail eggs should be rotated several times each day at an angle. Furthermore, one side of each button quail egg can be marked with an X, and the opposite side of each button quail egg can be marked with an O. Using such markings will allow for the incubator manager to ensure that the incubator manager has flipped every button quail egg.
Furthermore, automatic turner can be used to turn each button quail egg, or you can turn the button quail eggs manually. It is more important to ensure that the button quail eggs are turned each day then to ensure that each button quail egg is rotated perfectly. Candling is a process that is used to ensure that the embryos within the button quail eggs is developing properly.
For example, you can candle each button quail egg by holding a bright light against the shell of the button quail egg. If the embryo inside of the button quail egg is developing proper, blood vessels will be seen inside of the button quail egg. If no blood vessels are seen inside of the button quail egg, then that button quail egg have stopped developing; in such cases, those eggs should be removed from the incubator to prevent the spread of bacteria to the remaining button quail eggs.
Following the incubation process for button quail eggs, it is necessary to increase the humidity within the incubator and to stop turning the button quail eggs. During this final stage in incubation, it is important to never open the lid of the incubator; opening the lid during this period will drop the temperature within the incubator, as well as lower the moisture levels within the button quail eggs. Furthermore, the reason for increasing the humidity and preventing the button quail eggs from being opened during this period is to provide a stable environment for the button quail chicks to soften and exit their shells.
Additionally, you should of made no attempts to assist the button quail chicks in exiting their shells; most button quail chicks will be able to successfully hatch on their own. When the button quail chicks have hatched from their shells, they should be kept within the incubator until they are fully dry and fluffy chicks. It is important to not move the button quail chicks too early after they have hatched from their shells; moving the button quail chicks too early may lead to the chicks becoming chilled and weak.
Furthermore, when the button quail chicks are moved to a brooder, the chicks will need to be provided with warmth and access to shallow water dishes. Each stage of the life of a button quail chick is dependent upon the same level of care as was used to incubate the button quail eggs.